
Ever find yourself staring at the freezer, wondering what to cook for dinner? You’re not alone. Busy weeknights call for quick, hassle-free meals that don’t compromise on flavor. That’s where the magic of your air fryer comes in. Imagine transforming frozen salmon into a delicious, restaurant-quality dish in under 20 minutes—no thawing required!
With just a few simple ingredients and minimal prep time, you can enjoy moist, perfectly cooked salmon every time. Whether you’re a seasoned cook or a beginner, these recipes are designed to make your life easier. Plus, they’re healthy, flavorful, and perfect for those nights when time is tight.
In this article, we’ll guide you through everything you need to know—from essential ingredients to foolproof cooking techniques. Get ready to impress your family or even yourself with meals that are as easy as they are delicious!
Table of Contents
Essential Ingredients and Equipment
Having the right ingredients and tools can make all the difference in your cooking experience. Whether you’re a beginner or a seasoned cook, starting with quality items ensures delicious results every time.
Salmon and Key Pantry Ingredients
To create a flavorful dish, you’ll need a few essential items. Start with high-quality olive oil, which adds richness and helps achieve a perfect texture. Fresh lemon slices or juice bring a bright, tangy flavor that complements the natural taste of the fish.
Don’t forget pantry staples like salt and pepper. These simple seasonings enhance the overall taste without overpowering it. For added variety, consider herbs like dill or garlic powder. These ingredients are versatile and can be used in multiple recipes.
Recommended Kitchen Tools
Using the right equipment is just as important as the ingredients. A reliable basket ensures even cooking and prevents sticking. Look for models with non-stick coatings for easier cleanup.
When it comes to tools, a good set of tongs and a sharp knife are essential. These make prep time quicker and more efficient. If you’re investing in a new appliance, consider models with adjustable temperature settings for greater control.
By combining quality ingredients with the right tools, you’ll set yourself up for success in the kitchen. Every step, from prep to cooking, becomes smoother and more enjoyable.
Preparing Your Salmon for the Air Fryer
Proper preparation is the secret to achieving restaurant-quality results at home. Taking a few extra minutes to prep your ingredients ensures even cooking and optimal texture. Let’s dive into the essential steps to get your dish ready for the appliance.
Removing Excess Ice and Patting Dry
Start by removing any excess ice from your fish. Use paper towels to pat it dry thoroughly. This step prevents mushiness and helps the skin crisp up nicely. Defrosting first isn’t necessary, but cleaning off extra ice is crucial for even cooking.
Seasoning and Prepping Tips
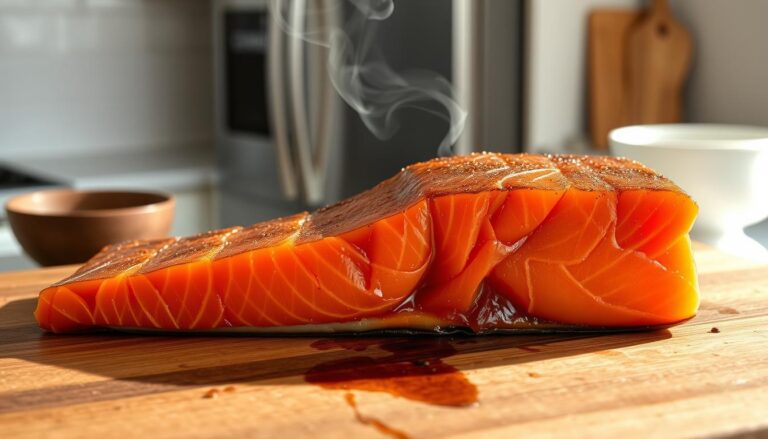
Seasoning is where you can get creative. A simple mix of salt, pepper, and olive oil works wonders. For added flavor, try herbs like dill or garlic powder. Always keep the skin on—it locks in moisture and enhances the overall taste.
“The skin acts as a natural barrier, keeping the fish moist while adding a crispy texture.”
Here’s a quick guide to prepping your piece for the best results:
| Step | Tip |
|---|---|
| Remove Ice | Pat dry with paper towels to ensure even cooking. |
| Season | Use simple ingredients like salt, pepper, and olive oil. |
| Keep Skin On | Helps lock in moisture and adds crispiness. |
| Preheat Appliance | Set to 390°F for optimal cooking time. |
By following these steps, you’ll ensure your dish turns out perfectly every time. Proper prep is the foundation of a great meal, so take your time and enjoy the process!
How to Cook Air Fryer Frozen Salmon
Cooking a delicious meal doesn’t have to be time-consuming or complicated. With the right steps, you can turn frozen fish into a gourmet dish in minutes. Let’s break down the process to ensure perfect results every time.
Step-by-Step Cooking Process
Start by preheating your appliance to 390°F. This ensures even cooking from the start. Place the frozen fillets in the basket, making sure they’re not overlapping. Cook for 7 minutes to defrost them slightly.
After the initial stage, remove the basket and lightly coat the fillets with olive oil. Season with salt, pepper, and your favorite herbs. Return the basket to the appliance and cook for another 7-9 minutes, depending on thickness.

“Checking the internal temperature is key to achieving moist, perfectly cooked fish every time.”
Optimal Cooking Times and Temperatures
To ensure your dish is cooked to perfection, use a meat thermometer. The internal temperature should reach at least 145°F for safe consumption. Here’s a quick guide to help you adjust based on thickness:
| Thickness | Initial Defrost Time | Final Cook Time |
|---|---|---|
| Thin (½ inch) | 7 minutes | 7 minutes |
| Medium (1 inch) | 7 minutes | 8 minutes |
| Thick (1½ inches) | 7 minutes | 9 minutes |
By following these steps, you’ll enjoy a flavorful and healthy meal in under 20 minutes. Whether you’re cooking for one or a family, this method guarantees success.
Enhancing Flavor and Texture
Transform a simple meal into a gourmet experience with a few creative touches. By focusing on flavor and texture, you can turn a basic dish into something extraordinary. Let’s explore techniques to elevate your cooking effortlessly.
Using Marinades and Citrus for Flavor
Marinades are a fantastic way to infuse your dish with depth. A simple mix of lemon juice, olive oil, and pepper can work wonders. The acidity from citrus brightens the natural taste, while olive oil ensures a moist and tender result.
For a more robust profile, try adding garlic or herbs like dill. These ingredient combinations are quick to prepare and require minimal time. Let the fillets sit in the marinade for at least 10 minutes for maximum impact.

Optional Garnishes and Sauces to Try
Garnishes and sauces can take your dish to the next level. Fresh herbs like parsley or dill add a pop of color and freshness. For a tangy twist, drizzle a sauce made with lemon juice and a hint of honey.
If you’re feeling adventurous, try a bacon aioli or a sprinkle of Cajun seasoning. These additions not only enhance flavor but also create a crispy, golden finish. Pair your dish with a simple side like roasted vegetables for a complete meal.
“The right garnish or sauce can turn a good dish into a memorable one.”
By experimenting with these ideas, you’ll discover endless ways to make your cooking stand out. Whether it’s a weeknight dinner or a special occasion, these tips ensure every bite is packed with flavor and texture.
Troubleshooting and Expert Tips
Even the best recipes can sometimes face challenges. Whether your dish turns out undercooked or the skin isn’t as crispy as you’d like, a few expert tips can help you achieve perfect results every time.
Checking Internal Temperature for Doneness
One of the most common issues is undercooked centers. To avoid this, always check the internal temperature at the thickest part of the fillet. The FDA recommends a minimum of 145°F for safe consumption. However, many prefer a medium doneness of 120°F–125°F for a juicier texture.
Use a meat thermometer for accuracy. Insert it into the side of the fillet, avoiding the bone if present. If the temperature is too low, return it to the appliance for an additional 1-2 minutes and check again.
Ensuring Crispy Skin and Even Cooking
Soggy skin can be disappointing, but it’s easy to fix. Start by placing the fillet skin-side down in the fryer basket. This ensures the skin gets direct heat, crisping up beautifully. If the skin still isn’t crispy, cook it separately for an extra 2-4 minutes at 400°F.
For even cooking, avoid overlapping fillets in the basket. Reposition them halfway through the cooking process if needed. This allows hot air to circulate evenly, ensuring consistent results.
| Issue | Solution |
|---|---|
| Undercooked Center | Check internal temperature; cook for an additional 1-2 minutes if needed. |
| Soggy Skin | Place skin-side down; cook separately for 2-4 minutes. |
| Uneven Cooking | Reposition fillets in the basket; avoid overlapping. |
By following these troubleshooting tips, you’ll master the art of cooking with confidence. Whether you’re a beginner or a seasoned cook, these methods ensure your dish turns out perfectly every time.
Conclusion
Making a healthy, flavorful meal doesn’t have to take hours or require complex steps. With the right techniques, you can enjoy a perfectly cooked piece in under 20 minutes. This method saves time and delivers consistent results every time.
By following the steps outlined, you’ll master the art of cooking with ease. Experiment with different seasonings, marinades, and garnishes to find your favorite flavor combinations. The possibilities are endless, and the results are always delicious.
Remember, checking the internal temperature and adjusting time as needed ensures your dish turns out just right. Whether it’s a quick weeknight dinner or a special occasion, this way of preparing meals is both efficient and rewarding.
Give it a try and discover how simple it can be to create restaurant-quality dishes at home. Share your experiences and inspire others to enjoy healthy, tasty meals without the hassle!